
WARNING: This bot will double your social media traffic while saving you hours upon hours on social media management.
If you're ok with that, let's go.
“It’s like a magic wand for social media management, except the wand waves itself.” - Zac Shaw.
Before we get into “the how”, let me show you the results I got:
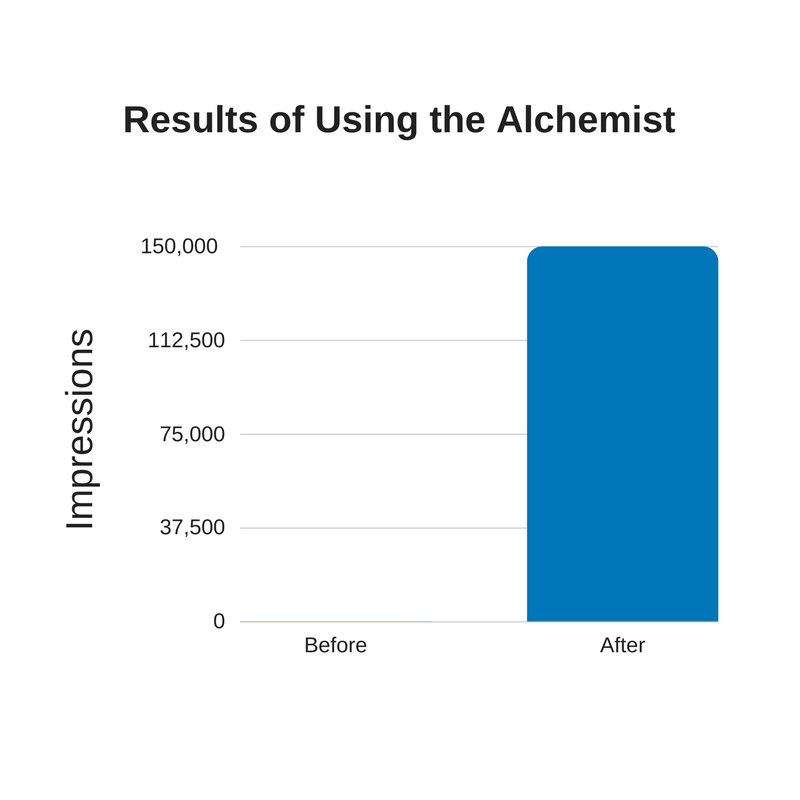

Now I’m going to show you exactly how I grew my engagement 1000x by recycling my social media updates with a bot.
Let’s dive in with a flashback.
In 2009, Laura started LKR Social Media, where she taught thousand of entrepreneurs and marketers how to take their social media marketing into their own hands.
One of her most effective strategies in her bag of tricks was recycling social media updates. On average, her students were seeing a 95% increase in their social media traffic.
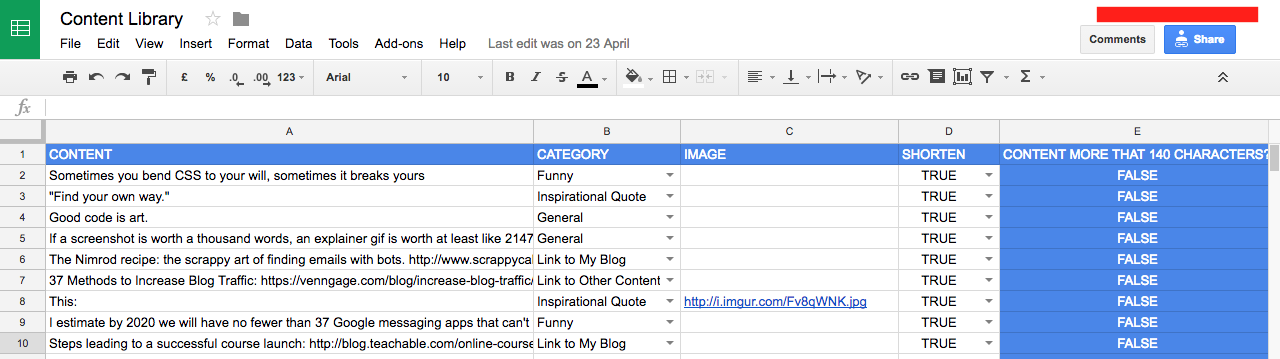
Doing this meant creating a content library, preferably in a spreadsheet. But there was one problem - recycling the content meant manually loading them into a scheduling tool over, and over, and over again. Pretty tedious!
Even worse, some scheduling tools, like Buffer, limit the amount of content you can schedule to just 10 posts. That’s probably 2 days worth of content for some of us.
Long story short, recycling social media updates brings incredible benefits, but managing social media is extremely tedious.
Laura’s answer was to build Edgar. A tool that endlessly schedules your social media. Thereby keeping your profiles fresh, while refilling itself without your input.
What if there was another way? What if you could hire a social media manager that takes content from your content library and loads them into the scheduling tool you already use, every day?
A bunch of professional bloggers do this already. This is how they go about it:
They come up with some quotes, write updates linking to their blog posts, think up some questions to keep people engaged, and so on.
Then they’d either pay someone an hourly rate to load up these social updates into a scheduling tool or directly on Facebook or Twitter.
Finally, they repeat this whole process the next day, or the next week depending on the plan on their scheduling tool, otherwise, their social media channels would go silent.
 “Nah Tomiwa, can’t afford to hire someone for fucking social media.” - Alessia (my girlfriend) Tweet This
 Well, Alessia. It’s 2017, you could hire a bot at no cost. It’ll work every day, It doesn’t get sick, it doesn’t complain, and best of all, it doesn’t ask for monthly payments ;)
Recipe Ingredients
Introducing the Alchemist: The bot that has the power to turn a free Buffer account into Edgar (hence, the name).
“Call it magic”
The Alchemist answers the question: “I want more people to see my posts on social media without paying for ads. How do I employ someone that recycles content from my library and schedules it on Buffer every day to increase the lifespan of each post?”
The Alchemist solves that. It takes your:
- Categorised content library
- Buffer credentials
And runs your social media on autopilot. Thereby:
- Saving you hundreds of hours per year, so you can spend time where it really matters - engaging with your audience.
- Getting 10x more mileage out of your messages with zero effort.
- Reducing the need to pay for ads all the time. Each time you recycle a post, it will be seen by new parts of your audience.
- Doubling your social media traffic and engagement.
- Never run out of posts on your Buffer queue. Even when you have the free plan that limits you to just 10 posts on the queue.
- Allowing for more and more intentional posts, because you aren’t rushed to get something up between a client call.
NOTE:
The next section is the step-by-step tutorial on how to install the Alchemist on your computer. From the feedback I’ve gotten so far, it’s a bit techy, If you’re not comfortable with that, some of you have suggested I create a web version of the Alchemist. Click the button below to join the waitlist.
Join the VIP waitlistHow to setup the Alchemist.
Step 1: Install Ruby
- If you're using a Mac, you will already have Ruby pre-installed on your machine.
- If you're using Windows, download these executable files and follow their instructions:
- Install Ruby with Ruby Installer
- Install DevKit
Step 2: Install PhantomJS
- Download PhantomJS here: http://phantomjs.org/download.html
Step 3: Download & Open the alchemist code
- Now that we have installed Ruby and PhantomJS. Download the Alchemist source here: https://github.com/tomiwaAdey/Alchemist/archive/master.zip
- Create a folder called "bots" on your Desktop.
- Unzip the file and place its contents in the bots folder on your Desktop. Every bot on Scrappy Cabin to help you automate your way to freedom will be nested in this folder.
- Download the Atom code editor. This software will allow you to edit the code.
- Open the source code in Atom by opening up the Atom editor on your computer, click on File > Open. Select the bots folder on the Desktop and click the “Open” button.
- Open up the config file.
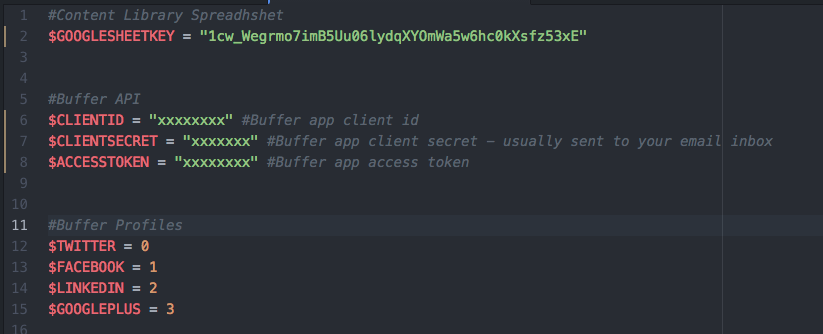
Step 4: Get the google sheet key and enter it in the config.rb file
- $GOOGLESHEETKEY variable lets the bot know which spreadsheet you want to get content from. For the sample content library spreadsheet above, the key is 1cw_Wegrmo7imB5Uu06lydqXYOmWa5w6hc0kXsfz53xE. Add the key in between the quote in front of the $GOOGLESHEETKEY variable. For example:
$GOOGLESHEETKEY = "1cw_Wegrmo7imB5Uu06lydqXYOmWa5w6hc0kXsfz53xE"
Step 5: Get your Buffer keys
- In the same config.rb file, you’ll see three variables for Buffer. $CLIENTID, $CLIENTSECRET, and $ACCESSTOKEN.
- Go here to create a buffer app: https://buffer.com/developers/apps/create
- Fill in the details as follows:
- Name: The name of the app will show up on your social media profile.
- Description: It’s just for you.
- Homepage: Put your website. You can also put any website, you can even put https://www.scrappycabin.com if you don’t have one.
- Then hit the “Create Application” button.
- You should now see your $CLIENTID and $ACCESSTOKEN. Your $CLIENTSECRET will be sent to the email you registered your Buffer account with.
- Now fill in the keys in the config.rb file as you did with $GOOGLESHEETKEY.
After you’re done with the config.rb file. It should look something like this:
Step 6: Get your Google Drive keys
- Allow the Alchemist to access your Google Drive account by getting your google client_id & client_secret with this guide. Once you get your “client_id” and "client_secret" keys, enter it in the file called “gdrive_config.json” as shown below:

For the instructions below, copy the commands, paste them on your terminal (Mac) / CMD (Windows), and press enter.
Good? Let's go!
Run the Alchemist
- Open up your command line by searching for “cmd.exe” on Windows or “terminal” on Mac.
- Then navigate to the bots folder.
- If you're on Windows enter:
cd \Desktop\bots - If you're on Mac enter:
cd Desktop/bots - Install Bundler:
gem install bundler - Install the gems:
bundle install
Finally, we're good to go. Still there with me?
This is the only command needed to run Nimrod from now on (provided you’re in the bots folder):
ruby app.rb &
Simple isn’t it?
Using the Alchemist.
Step 1: Add content to your spreadsheet
- Copy the format of the spreadsheet above in your Google Drive. PS: It's important that you do not change the order of the columns.
Step 2: Buffer scheduling times
- Go to your Buffer account and schedule posting times based on the number of times you want to post per day. You can also use this tool by Buffer. For example, if you want the alchemist to schedule three posts per day, then you’ll have to add three posting times.
- Then you can just run the Alchemist as I showed you earlier with the command: ruby app.rb &
Cron Jobs
If this question comes to your head, “Do I have to open the terminal/command line and run the command “ruby app.rb” every day?”, you’ve been following along nicely.
Introducing Cron Jobs, AKA how to tell a computer to do run a task as frequently as you want it (i.e. every day, every hour, at 1 pm every day, and so on).
Cron Jobs on Mac
- Go to terminal, any type in “crontab -e”
- Press “i” to enter the “insert” mode
- Then type in your job (the time format followed by the directory the program is in), for example:
0 12 * * * Desktop/bots/Alchemist/app.rb
- PS: Look at this guide for more information on the cron syntax: https://www.scrappycabin.com/guides/cron-format
- Press ESC to exit the insert mode
- Type “ZZ” in capital letters
- And you’re good! If you want to double check it’s live, you can type in “crontab -l”
Cron Jobs on Windows
- First, open control panel, navigate to “system and security,” then “administrative tools,” then “task scheduler”
- Second, click “action,” then “create basic task” and give it a name
- Finally, follow the wizard, and Windows will help you get your job set up!
The Alchemist Web Version.
Why a web version?
There are two reasons.
- From your suggestions, some people are more comfortable with / prefer a web software. They don’t want to deal with the hassle of setting up Alchemist on their computer. Fair enough :(
- Cron jobs require your computer to be awake. If your computer is off or asleep, the cron job will not run, hence the Alchemist will not work. This is a perfect job for a web server that’s constantly awake.
And that’s why I’ve decided to turn this bot into a web tool (website) that’ll help you maximise the life of your content by continuously sharing it on social media at a perfect frequency and keep your audience aware of and engaged with your brand.
All these at the click of a button.
Click here to join the Vip waitlist
Takeaway
As they say, you’re just one content away from reaching your wildest business goals. But instead of hoping people gravitate towards your content because it’s the best content out there, you can take matters into your own hands by sharing them on a recurring schedule. Over time, you can now reach every single person.